Home Theater Forum and Systems banner

Epik 15" DIY Ported Subwoofer

108K views 54 replies 16 participants last post by  dboff01  
#1 · (Edited)
Background:

I've been itching to build a DIY subwoofer since I purchased the Epik Valor in early 2008. The Valor is a quality sealed 15" design with a 350W BASH amp. It has served me well since I bought it but I've always been interested in the extra output and extension offered by a ported design. I had wanted the Knight at the time of purchase but the wife shot it down due to size (now it's time for payback :)). I started to investigate purchasing a new driver and amp, thinking I might sell the Valor to subsidize the build.

Ultimately, I decided to design and build a new ported enclosure and transplant both the Epik 15" driver and amp into the box. As some may recall, Chad used to sell the Valor, Knight, and Caliber models in different enclosures but using the same driver and amp combo. So, in effect, what I am building is equivalent to something between the Knight/Caliber in size and tuning frequency. I e-mailed Chad my plans (including the below Sketchup drawing) and he blessed the project saying the performance should be excellent. While he didn't provide the T/S parameters of the driver, he did indicate the driver has 27-29mm Xmax (one-way) and the plate amp has a HPF at 20Hz as well as a boost at 20Hz.

The Valor is currently used as an end table at the end of my couch. The new ported enclosure will occupy the same space and has been sized to fit in this spot.

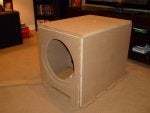
Here is a pic of the Valor in its current home:


Here is a pic of the 15" Valor driver:


Enclosure Specs:

Driver: Epik 15" Valor/Knight/Caliber
Box Dimensions: 20"W x 24"H x 28"D
Port Dimensions: 12"W x 2.5"H x 35"D
Box Volume: 5.1 cf
Tuning Frequency: 20Hz
Amp: 350W plate amp (HPF @20Hz)

For comparison, the Valor enclosure is 16.5"W x 22"H x 21"D.

Here is the Sketchup drawing I used to create the cutsheet:


Build Plan:

The box will be made from MDF. The current plan is to use wood veneer to finish it with quarter-round around the front face. I'm not decided yet on the wood type but would like to stain match my TV stand.

I'll be gluing and screwing (I have minimal clamps and am impatient) using square-head trim screws as recommended in one of the sticky threads here.

I've made all the cuts and did a dry fit this week, all looks good. Panel cuts were made with a table saw. Circle cuts and framing cuts were made with a jigsaw.

Here are a couple of pics of the dry fit:


If all goes well, assembly of the box should begin this weekend. :)

Steve
 
#2 ·
That's looking very impressive already.
As for the staining I find to match another piece of wood you will need to keep all your offcuts and try it on them first.
Let me know how you get on as it can be tricky and there is an art in getting it right.
Feel free to pm me if you get stuck.

Cheers,
Bill.
 
#3 ·
As for the staining I find to match another piece of wood you will need to keep all your offcuts and try it on them first.
Let me know how you get on as it can be tricky and there is an art in getting it right.
Feel free to pm me if you get stuck.
As I've never veneered or stained anything, I may take you up on your offer. Thanks.
 
#4 · (Edited)
Only had a couple of hours of spare time today to start assembly, I'd say I'm approximately 1/3 complete.

First glued and screwed some practice pieces to get a feel for how much glue (Titebond) to use and how easily the screws would bite/recess. Started with too much glue, lots of dripping down sides. Settled on a practice of laying a bead and then gently dragging my finger across to evenly coat surface. Kept a wet rag handy to clean up any excess after each piece was secured. Used a handful of clamps (2 - 3' and 2-1' I picked up at Harbor Freight for cheap) to secure the work while I pre-drilled and inserted screws, the process worked very well.

As of now the L-port is fully built and secured to the bottom of the sub-woofer frame, and 1 side is attached to the bottom as well. In my haste I forgot I wanted to paint the port surfaces near the opening black before securing ... oh well I'll tackle that next. Also will add a bead of silicone to all internal seams while I still have access to them. I must say the square-head trim screws are a cinch to work with, don't slip and easily recess themselves, no need for countersinking.

Was so pressed for time today, no new pics taken, but I'll take some on the next building session. Hopefully prior to next weekend, but weekdays are always hit-or-miss for personal projects.

Steve
 
#9 ·
Had the day off and made a bit more progress. Port is painted black using Rust-Oleum flat black spray paint. Front inner baffle and rear wall are now also installed. Using silicone to seal all inner seams.

Here are some pics of the current progress.

Side, back, and port installed ...


Close-up of trim screw to show nice natural recess ...


Side shot with front inner baffle, side, rear, and port installed ...


And one more for good measure ...


Had to stop today because went to install quarter round at top of inner port opening and realized I only have 1/2" quarter round in the garage, need 3/4". Will have to make a run to the store tomorrow to pick it up.
 
#12 · (Edited)
Here are some new pics of today's progress ...

Quarter-round added to port opening ...


Internal bracing assembled and installed ...


Installation of front baffle ...


Top view of current state of sub ...


Only pieces left to secure are the subwoofer top and quarter-round around the front face. Then wood fill and sand all screw holes, round-over the front port opening for flare, install driver and amp and give it a test run. Next build session will probably be next weekend, tomorrow is booked.
 
#16 ·
Decided to put a little thought tonight into the grill design as I hadn't really considered it yet. Compared a round driver cover vs rectangular, modeled both in Sketchup, and both the wife and I preferred the rectangular.

The plan is to cut an MDF frame covered in black speaker cloth and mounted by magnetic grill guides (which will lay under the wood veneer). I may do a soft round-over or bevel on the front of the frame for style. The magnetic grill guides and speaker cloth should arrive tomorrow from Parts Express.

The finished result should look something like this ...

 
#17 ·
Yummie! I think your subs would do a good job as my sub 3+4 in HT... Have to finish HT first and see what sub 1+2 produce.
 
#18 ·
A few more hours of work on the subwoofer today. Box assembly is basically complete, top has been added, 1/4 round added to front face, front port has been flared, screw holes filled twice with wood filler.

If I can get some time in tomorrow, I should be able to fire it up. I do need to add some additional length to the speaker cable from the Epik amp, as my subwoofer is 8" deeper than the Valor cabinet, and there isn't enough slack.

Here are some pics of today's progress.

Top added to box ...


All inner seams sealed with silicone ...


Quarter-round added to front face ...


All screw holes filled once with wood filler ...


Front port flared with 1/2" round-over bit ...


And all screw holes filled a 2nd time and sanded ...
 
#19 ·
Finally got a chance to fire it up tonight. First impressions are good, however my 3 yr old was already asleep by the time I turned it on, so I couldn't really push it. I listened to Nemo's Darla scene, Iron Man Escape from Cave scene, and Polar Express Train Arrival scene.

Ran into a problem today in that my outer circle cutout was a bit too tight and not quite perfectly round as I used a hand-held router for the cutout. That required almost an hour of using a grinding bit on my drill to open the hole a bit more so the driver would drop in. Lesson learned is next time I'll take the time to create a proper jig and use the router for the circle cuts.

I figure I'll leave the sub in the room for a little while, measure the frequency response, to make sure its performing as I'd expected. Then I'll continue with the finishing, including building the grill cover, and installing the wood veneer.

The wife is a little peeved with the size increase. :hissyfit: I told her she's only noticing because its not properly finished yet. :bigsmile:

Here are some more pics of today's progress.

Did a bit more work properly finishing the port opening ...


Painted the back black to minimize attention (I won't be finishing the back with veneer) ...


Another pic of the face ...


Size comparison between my ported enclosure and the original Valor enclosure ...


A 2nd size comparison ...


A pic of the sub in its final resting place ...
 
#20 ·
Performed some more spirited listening sessions, including Master and Commander First Battle scene and War of the Worlds Pods Emerging scene. :hsd:

To my ears, output is significantly improved down low from sealed enclosure. Also listened to some bass heavy music (primarily through MOG streaming from Roku player) and didn't notice any degradation in sound quality as some have indicated when going to a ported alignment.

I also performed a frequency sweep (14 Hz to 160 Hz) using a test tones CD I created and my Radio Shack analog SPL meter. I don't have a laptop with proper soundcard capability for REW. :( I sat in the primary listening position in the room which is about 10 ft from the subwoofer for all measurements. I set my receiver volume to -30 and manually recorded the measured SPL for each tone, adjusting the frequency range on the meter as necessary. I didn't disable the main speakers and my receiver crossover is set for 80 Hz. I fed the raw values into the Excel spreadsheet from HTS (with meter correction factors included) and took the corrected values and pasted them into a new clean spreadsheet for graphing. I think I did all that right. :huh:

Here are the results:


I see some good and some bad here. It looks like I'm getting good output down to under 20 Hz which is where the HPF is. This is the primary benefit of ported over sealed and the reason I wanted to do this project. The bad is it is not a terribly flat response, highlighted by the peak at 40 Hz. I don't currently have any subwoofer EQ capability and the position of the sub is fixed based on furniture layout. Perhaps a MiniDSP is in my future. :)
 
#24 ·
Well over a year later and a 2nd child added to the household, I have some progress to report on the finishing of this project.

I created the grill from MDF and Parts-Express black speaker cloth. My plan to use the Neodymium magnets to hold the grill in place is a FAIL. I drilled a small recess to hold the magnets in both the grill cover frame and body of the subwoofer, dropped the magnets in the hole sitting in a pool of glue, then wood filled a small layer over the top of each magnet. When all is said and done, there isn't enough magnetic force to prevent the grill from shearing down the face of the subwoofer. No big deal, I'll simply buy standard ball/socket type grill mounts to ensure the cover stays in place. Perhaps if I used 8 pairs of magnets rather than 4, it would have been sufficient.

I also ordered a BASH 500S last week when went on sale at Parts-Express to add a little extra overhead above the 300W that came with the subwoofer. Plan is to modify the resistors for bass boost tomorrow. I am also planning to do a final sanding of the box this weekend prior to attach of maple paper backed veneer I've purchased. I'll attach the veneer via contact cement.

Also as Epik Subwoofer announced they are going out of business, they've published the T/S parameters of the Valor driver because they're selling off remaining stock. I am now able to simulate in WinISD the actual performance of this specific driver in my enclosure which I wasn't able to do before.

Attached is the basic before and after sim, before being the stock Valor sealed configuration and my new ported enclosure with 500W BASH amp. This gives a basic visual of the extra output I've gained by the project.
 

Attachments

#28 ·
Here's a SPL comparo to show impact of sealed -> ported enclosure impact as well as BASH 500 upgrade.

Yellow = Epik Valor (Sealed)
Red = DIY Ported Enclosure with Epik 300W
Magenta = DIY Ported Enclosure with BASH 500s


Here's is the equivalent cone excursion graph which indicates no probs.


With the BASH 500 my port velocity maxes out at 28 m/s which is a little higher than I'd wanted, but it occurs around 18-19 Hz so I expect I'll be fine. I'll likely not be running the thing anywhere near max output often.
 
#30 ·
I modified the BASH amp HPF/Boost resistors last weekend as planned.

Got a late start today so only managed to cut the 4 veneer panels to size (top, sides, face) and attach the top via contact cement.

Here's a pic:


Also one with the grill shown:


Tomorrow I've got a kiddie party to attend so this weekend may be done for subwoofer progress ...the saga continues.